Thursday, October 31, 2013

No Sew Tutu

Just wanted to tell everyone HAPPY HALLOWEEN!!!
One of my favorite holidays ever...


Thought I would share with you the costume my daughter and I made last Friday night.  Took a few hours but it was worth it.
She is so proud of her tutu.
She added a superman shirt to it and became Super Girl.
She tried to convince me that she will wear it again. Since we used red, white, and blue she is planning on wearing it for the 4th of July. lol


This is all we used.  Well, kind of...
I did end up going back to Walmart to purchase three more rolls of tulle.  So, our project included:
2 rolls of blue
2 rolls of red
2 rolls of white
The tulle was $2.99 a roll and the elastic was about $1.50.
Ended up not being the cheapest costume but we had a lot of fun making it.
I sewed the elastic together instead of putting a knot in it because it was wider elastic.  The rest was all no-sew.  We measured how long we wanted the tutu and then doubled the tulle.  We put all three colors together and then tied it around the elastic.  If you are making it for a little girl it won't take as much tulle...

If any of you are heading out trick-or-treating tonight stay safe and have fun.

Monday, October 28, 2013

Halloween Party Ideas


This weekend I put together a Halloween party for the kids (and a few adults too).  I have to say, it was a great success!!!  I thought I would share a few picture of the food items that I had for everyone to enjoy.  I got my inspiration off of Pinterest but I am including how to make them along with the pictures.  You can add/change anything you want if you decide to make any of it.  I improvised a little...
The Puking Pumpkin
One smaller pie pumpkin in whatever shape you prefer (clean it off good, carve, and gut it out)
I used 4 avocados (double batch)
2 packets of guacamole mix
There are different brands of guacamole mix that you can buy.  I've used two different kinds and I didn't really see a difference in flavor.  When making it, don't make it too far in advance because it will start to turn color.  I made this one about a half hour before serving.
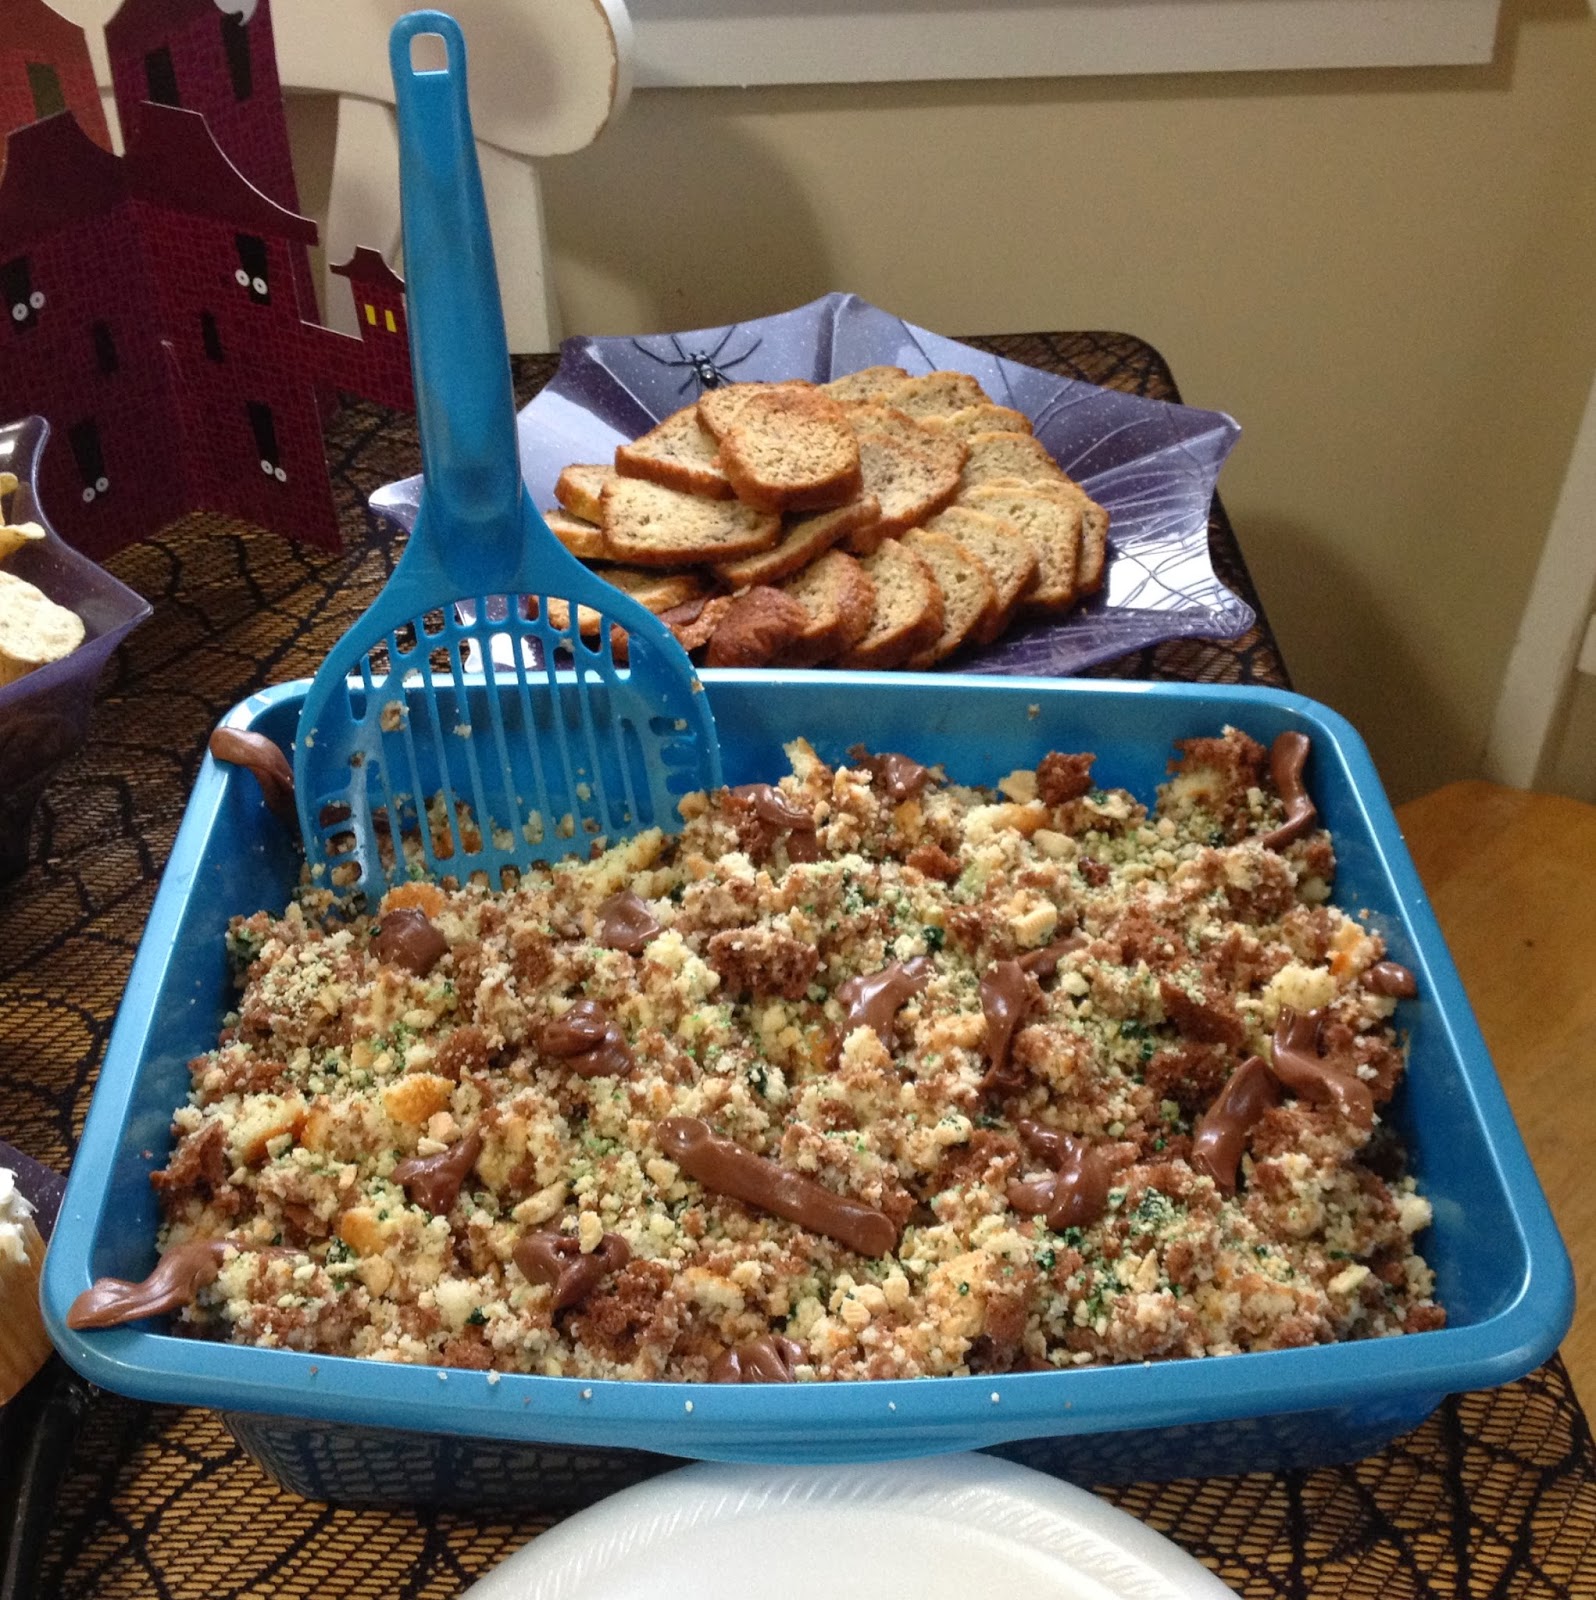
Kitty Litter Cake
1 box German Chocolate Cake mix
1 box of white cake mix
1 box of vanilla instant pudding
A handful of Tootsie Rolls
1 package of vanilla cookie (like Oreo but not chocolate flavored)
Green food coloring
Make cake mixes according to packages.  Break them both up into little pieces.  Mix pudding according to package directions and let set up.  Crush cookies into tiny pieces (reserve about 1/4 cup of cookie crumbs to mix with a few drops of food coloring).  In a NEW kitty litter tray combine the cake, cookies, and pudding.  Soften the tootsie rolls up in the microwave for a few seconds to soften.  Form into kitty "poop".  Try to stick some of the "poop" within the cake too.  Place the rest of the "Poop"  on the top with some coming over the edge for good effect.  Sprinkle the remaining cookies on top of the cake.
Eye Ball Cupcakes
1 package of cake mix
Cupcake tin and liners
2 cans of white frosting (We like lots of frosting but you can probably use just one can)
Gumballs or jawbreakers
M&M's ( I used orange and brown since I was unable to find any black)
1 tube of red frosting (fine tip)
It is pretty much self explanatory.  I let me daughter make these and I think she did a pretty great job.

Spider Eggs
1 dozen eggs
Sweet Relish and Mayo (to your taste)
1 can of small black olives (I used medium and I felt they were too big and a little hard to work with.)
Boil the eggs, peel, and divide into egg tray.  Combine the egg yolks, sweet relish, and mayonnaise together in a bowl.  Spoon or pipe the yolk mixture into the eggs.  Cut olives in half.  Use one half for the body and the the other half into small pieces for the legs.  Assemble as shown in the picture.  Even though they were really cute, I have to admit that most people took the olives off before eating them. That was okay though because I got a picture and they turned out cute!!!  Isn't that what matters. lol

I hope this inspires you...
Have a happy Halloween!!!


Friday, October 25, 2013

Halloween Spider Wreath

With Halloween so close I thought it was a perfect time to complete a quick little project.  I decided on making a wreath for the door.  At first I was going to make it with bats but when I saw these neat spiders, I thought that was a better choice.  This is the kind of project that anyone can do and costs less than $15.00...
All you need is:
14" foam wreath
Burlap (I used the wired ribbon type to make it easier)
Medium size spiders
Push pins
Hot glue

I purchased everything I needed at Wal-mart but I am sure you could get it cheaper somewhere else.
Foam wreath - $4.47
Burlap - $5.97
Spiders - $2.27
Wrap the foam wreath with burlap (overlapping the edges).  Continue all the way around until the ends meet.  This is where you could use the push pins if you need to.  I didn't really need them until the end.  I only used them to hold the ribbon in place until I was able to hot glue it.  Once the wreath was completely covered I cut it and glued it.  I then cut another piece of burlap and used that to hang it.  I glued it to the wreath so that it would stay in place and tied a neat little knot to add some character. Then I glued the spiders to the wreath.  I chose to only put them on part of the wreath so it looked like they were climbing up it.  When the glue was set, I hung it up.  I actually put it on my front door (not pictured there).  This is something that would even look good hanging on a wall.  I hope this gives you a fun and easy project to do.
Have a safe and fun Halloween!!!


Friday, October 18, 2013

Pantry Door Organization


I thought I would share something a little different today.
This is my pantry door.  As you can see, it is one of those louvered style ones.  That made it a little more difficult to utilize the space.  I was thinking about using those over the door organizers but I didn't want it to show when I had the door closed.
This was the perfect excuse to head to Ikea.  I love Ikea!!!  Since I tend to spend a lot of money there, I really have to find a way to justify a trip there.  Plus, it is over three hours away so it ends up being an all day trip.
This is what I did:
At the top I inserted 4 little hooks and bought some chain.  I used the small chain that you use to hang plants.  You can purchase it by the foot at some stores but I just bought a little package of it at Wal-mart.  I only used 4 of the hooks because I wanted to make sure there was room between them so that the items I hung on them would hang freely.  It has freed up so much space in my kitchen drawers.  I have cookie cutters, potato masher, crock pot spoons, grater, an apple corer/slicer, and my pancake molds.  You can hang just about anything on them...
Next is where Ikea comes in.  I purchased two of the smaller Fintorp rails ($8.99 each), three packages of the smaller hooks that go on the rail ($2.99 for a pack of 5), one wire basket with handle ($12.99), and six cutlery buckets (I bought the cheaper ones @ $3.99 each).  You can use any combination you want.  I just felt that this combination worked best for me.
Between the Fintorp rails I have two small wooden spice racks.  There is a section of wood that separates the louvers so they worked perfect.  I got the little racks from the Home Depot during one of their kids workshops.  They were free!!!  If you aren't familiar with the kids workshops, they are held the first Saturday of every month.  You just show up sometime between 9am and noon.  Fill out a little paper with your name and the kids names and ages and they give you an apron for the kids and a project.  Every month is different so it makes for a nice activity for the kids.
I am thinking I could even fit one more rail near the bottom with more buckets.  The buckets are great for holding snacks, boxtops for education, bag clips, etc...  I am thinking that another trip to Ikea may be in the near future. :)
I will be adding different organizational tips as the days go on.  That is one of my favorite things to do (organize)...

Wednesday, October 16, 2013

Cajun Parmesan Potatoes with Bacon

Cajun Parmesan Potatoes with Bacon

I know this doesn't look special but it tastes so good.  And, it is super easy to make...

Ingredients
3 or 4 potatoes diced (more or less depending how many you want)
Cajun seasoning
Season salt
Garlic Powder
Pepper
Parmesan cheese
Bacon


Directions
Peel and dice potatoes.  Set aside.  I put them in a bowl of cold water until I am ready for them.  In a large skillet, fry bacon.  Reserve the bacon grease to fry the potatoes in.  You can use margarine or olive oil but the bacon grease gives it more flavor and doesn't dry the potatoes out.  Crumble the bacon into small pieces. Set aside.  In the same skillet, fry the potatoes until they are the tenderness you desire.  Add all seasoning to your liking.  I found that you have to add quite a bit of the cajun seasoning if you want it to be a little hot.  When the potatoes are fully cooked add the bacon and the parmesan cheese.  That's it!!!
I told you it was super easy.  This is one of my go to meals when I don't know what else to make.  Or, when I am feeling a little lazy. lol
 

Saturday, October 12, 2013

Homemade Pizza Rolls

Homemade Pizza Rolls...
I decided to use up some of the items that I already had in my home to make dinner tonight.  What a good decision!!!
This is really one of the simplest meals I have made in a long time.  At least that did not come out of a pizza box...  I only made 20 of these but should have made tons more.  Good thing several of my kids were not home tonight to help eat them.


Ingredients
2 rolls of buttermilk biscuits (10 count each)
40 pepperoni
20 chunks of mozzarella cheese 
Real Crumbled bacon (optional)
1 egg
Italian seasoning
Garlic Powder
Parmesan cheese
1 jar of pizza sauce (or Ranch)

Directions
Preheat oven to 425 degrees F.
Slice at least 20 chunks of mozzarella cheese (you can use a different type if you prefer).  Flatten each biscuit.  Working with one at a time.  Place two slices of pepperoni and one chunk of cheese on each biscuit.  I stacked them so that the cheese was sandwiched between the pepperoni.  This is the step that you could substitute the bacon for the pepperoni.  I made a few that contained 1 pepperoni and a little bacon together.  Fold the biscuit so that each edge over laps.
Place the biscuit so that the folded edge is facing down on the pan.  I used a baking stone to bake mine but you can also use a 9x13 greased pan.  Continue with the remaining biscuits.
In a small bowl beat the egg.  Brush the beaten egg onto the tops of the biscuits.  Sprinkle with the Italian seasoning, garlic powder, and Parmesan cheese.
Place in preheated oven and bake for 10 minutes or until tops of biscuits are golden brown.
Serve with pizza sauce (or ranch).


I personally recommend using the ranch if you put bacon in them.  There is just something about bacon and ranch together. Yum!!!
I hope everyone that makes this recipe enjoys it as much as my family and I did.

Tuesday, October 8, 2013

Zucchini Brownies

Today I made some super yummy brownies!!!
When I found this recipe I did not think I would like it because I really do not like chocolate cake.  I even scrape the frosting off of the cake and eat just the frosting.  That is how much I do not like chocolate cake...
But I can't seem to get enough of these.  OK, I can eat two pieces max without having chocolate overload.  But then I come back later for more. lol
I almost forgot to mention the best part.  Well maybe not the best, but a good part.
IT'S EGG FREE!!!

Doesn't it just look so moist and chocolatey???
I got this recipe off of www.allrecipes.com.  Originally posted from someone named Marian.  I wish I would have come up with this recipe but nope.  So, I had better give credit where credit is due...

Zucchini Brownies

 Ingredients
1/2 cup vegetable oil
1 1/2 cup white sugar
2 teaspoons vanilla extract
2 cups all-purpose flour
1/2 cup unsweetened cocoa powder
1 1/2 teaspoons baking soda
1 teaspoon salt
2 cups shredded zucchini ( I use one medium size zucchini)
1/2 cup chopped walnuts ( Optional- I left this out because I do not care for them)

6 tablespoons unsweetened cocoa powder
1/4 cup margarine
2 cups confectioners' sugar
1/4 cup milk
1/2 teaspoon vanilla extract

Directions
  1. Preheat oven to 350 degrees F (175 degrees C).  Grease and flour a 9x13 inch baking pan.  I found a glass pan works the best.
  2. In a large bowl, mix together the oil, sugar, and 2 teaspoons vanilla until well blended.  Combine the four, 1/2 cup cocoa, baking soda, and salt;  stir into the sugar mixture.  Fold in the zucchini and walnuts (optional).  Spread evenly into the prepared pan. 
  3. Bake for 25-30 minutes in the preheated oven, until brownies spring back when gently touched.  I insert a cake tester in the center to see if it comes out clean.  To make the frosting, melt together the 6 tablespoons of cocoa and margarine; set aside to cool.  In a medium bowl, blend together the confectioners' sugar, milk, and 1/2 teaspoon vanilla. Stir in the cocoa mixture.  Spread over cooled brownies before serving.
Though I am not promoting the site that I got this recipe from I do recommend it to anyone who has a few minutes to browse.  I have found so many good recipes off there...
I hope you enjoy this recipe as much as I do...

Monday, October 7, 2013

Little steps

I thought today was going to be a super awesome crafty day for me but I was sadly mistaken...
I spent so much time sitting at the computer trying to do updates and downloads that my morning just flew by. I was able to transfer over a thousand pictures/videos onto my computer which allowed me to clear them off my phone. I have been wanting to do that for a long time so I suppose you could say it was a semi-productive day. Plus, I downloaded the most recent version of iTunes onto my computer. I was putting that off too.
Now to get the laundry folded and taken care of before the kids get off the bus. I never accomplish anything once they arrive home so I better get to it now.
It goes to show, just because you can't see what I have accomplished it does not mean that I haven't been productive.😊

Sunday, October 6, 2013

First time posting...

Well, I finally did it!!!
I finally created a blog.  I can't wait to post all sorts of stuff.  Kind of like an outlet for me.  Somewhere to post all the things that I do that I want to share with those that like to see what I am up to without having to post everything on Facebook so those that don't want to see it won't.
I am sure I will get better at this as I use it more.  So, if there is anyone looking at this, please be patient with me and don't stop looking just because I am boring.